De-Coding Useful Color-Coding Tools
Organizational tools that have come in handy as a college student
Confession: I’m a bit obsessed with color-coding but I wasn’t always this organized.
The Perfect Storm
The beginning of the pandemic was hard for countless reasons, but as a college student, it was especially hard to adapt to online learning. Everything about normal life came to a halt, but I still had to complete my assignments, take tests, and write essays. During this time, days blended together, and it became hard to stay on top of my work. It was apparent that I lacked organizational skills. This made it difficult to complete work and normalized procrastination.
Once reality set in that the pandemic was going to be a lot longer than just two weeks, I decided that it would be in my best interest to get organized. Everyone’s brain is wired differently so not every organizational skill will be helpful. For me, the most helpful organizational skill I learned to utilize was color-coding. It was so easy to add color-coding into my daily life and technology made it even easier. I was surprised to learn that many of my friends didn’t know about the techniques that I utilized.
Quick Tips
De-Coding the Quick Tips
Choose Your Colors
While this might seem like an obvious step, it is so important! For some classes, I choose my class color based on content associations. For example, one of my current classes, Environmental Hazards and Disasters, is green because of its association with nature. Other classes, I just use my favorite colors. If color association doesn't make sense for you, choose your colors however works best!
Develop Your Code
I base my color code on each class and my part-time jobs, so every class and job has a different color that is associated with it. This helps me stay organized because if I see a lot of green on my calendar then I know I should dedicate a lot of time to my Environmental Hazards and Disasters class. I also know that anything in my green folder, green tab, or anything highlighted in green is associated with my Environmental Hazards and Disasters class.
I use this code because it fulfills my needs and I use many different platforms to stay organized. This allows me to quickly transfer information between the platforms. Although this fulfills my needs, it might not fulfill yours and that’s okay! This is about meeting your needs with an organizational system that works for you. Another example of a color code is associating a color with tasks (e.g. exams are blue, short assignments are green, doctor appointments are orange, etc.).
Pro Tip: always make sure you keep your color code up to date with your needs, so check in with yourself often to see if your needs might have changed. If your needs change, your color-code might need to be revamped to fulfill your needs.
Take Advantage of your LMS
Learning management systems (LMS) are programs like Canva and Blackboard, and they make tracking students’ progress and performance easier. My college opted to use Canvas for its LMS. That being said, I am unfamiliar with systems like Blackboard and what tools they have to offer That’s not to say, that other LMS don’t have helpful tools (I just don’t know them). Just fiddle around with it! Here is a resource to get you started with Blackboard.
These systems are specifically made to make work easier, so there are helpful tools built-in. One tool I love is being able to change my class colors. This allows me to stay consistent across all my avenues of organization. To access this feature, log into your Canvas page and make sure it is on card view. You can access this feature by clicking the three dots in the right-hand corner. Additionally, make sure color overly is selected.

After, your dashboard should look something like this:
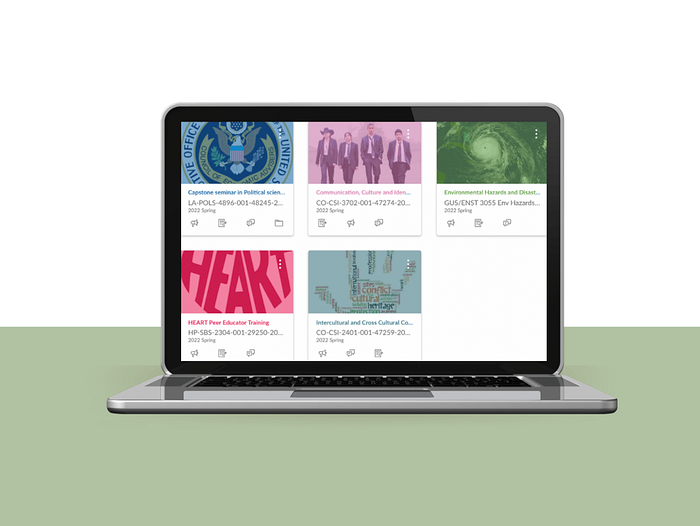
This allows all classes and class colors to be shown. Each class square has its own three dots. Click on the three dots to open the color options.
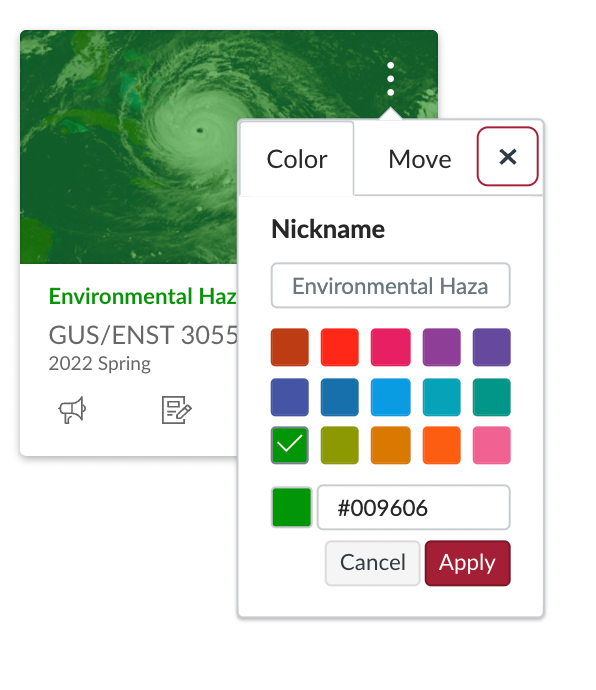
There are many options for colors, but if none of them tickle your fancy you can also enter specific number codes.
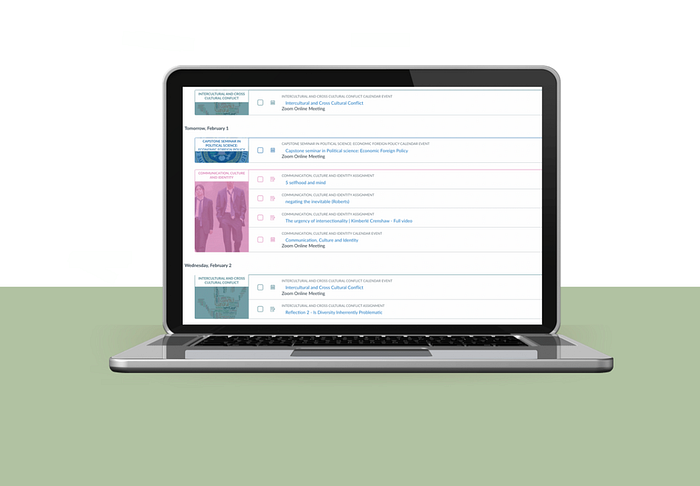
I prefer having my Canvas on list view because it shows the assignments, meetings, and announcements that are scheduled for each day. This allows students to know what is due on a daily basis. Also, on the left side of all events, there are checkboxes to further stay organized. Depending on the assignment it can be checked off automatically when the assignment is turned in through Canvas, but sometimes it needs to be done manually if the assignment is through a third-party platform.
Utilize Google Workspace or Microsoft Office
Both Microsoft Office and Google Workspace offer different tools to help users stay organized. I prefer to use Google Workspace applications because that is what I am most comfortable with due to university preferences. Again, that's not to say that Google is better than Microsoft, it is just about figuring out what works best for you and meets your needs. For more advice about Microsoft’s organization tools check out this blog! Whether you decided to use Google or Microsoft, it is recommended to stay consistent with one program as it makes the organization easier.
Google offers many different tools that help with organization and color-coding specifically. The tool I love the most is the folders within Google Drive, Google Sheets, and grouping tabs on Chrome.
Folders in Google Drive
This is a super easy step to getting organized. After choosing your class colors in Canvas, apply the same colors to your google class folders. How you change a folder color is by right-clicking on the folder. This will bring up an option list hover over change color and select your desired color.


I had a little bit of trouble matching my Canva colors to the Google folder colors because there is only a fixed amount of options. So instead of a greenish-blue, I oftentimes had to substitute with a light blue. Overall, I love this feature because I can just click on the green folder without thinking about which folder is for Environmental Hazards and Disasters.
Google Sheets
Google Sheets is at the intersection of my love for color-coding and list-making. Each semester I make a color-coded list of all my assignments, exams, and projects. All of the lists have the same setup. Four columns with the headers: Completion, Class, Date, and Assignment Name. With this information, I’ll know if I have completed the assignment, what class it is for, when it is due, and what the assignment is named. Additionally, I break up the assignments based on months.

Organizing my list this way allows me to see all of the assignments I have completed which instills a sense of accomplishment; I get the satisfaction of crossing assignments off and see the completed assignments grow. Adding color-coding better allows me to schedule and see which classes will take the majority of the time. It allows me to plan for the long term, so I don’t overbook myself for a particularly busy month. In the same vein, adding the names and dates helps triage assignments from least to most important when I’m tackling the days’ work.
Pro Tip: Bookmark your Google Sheet assignment list by clicking the star, right of the address bar. This makes accessing the list quick and simple—no need to hunt it down through Google Drive.
Tabs on Chrome
A relatively new feature that Google Chrome offers is the ability to group tabs. This condenses the number of tabs that are shown. To create a new tab group, right-click with two fingers on the tab itself (as if you were switching tabs.) Click add Tab to New Group.
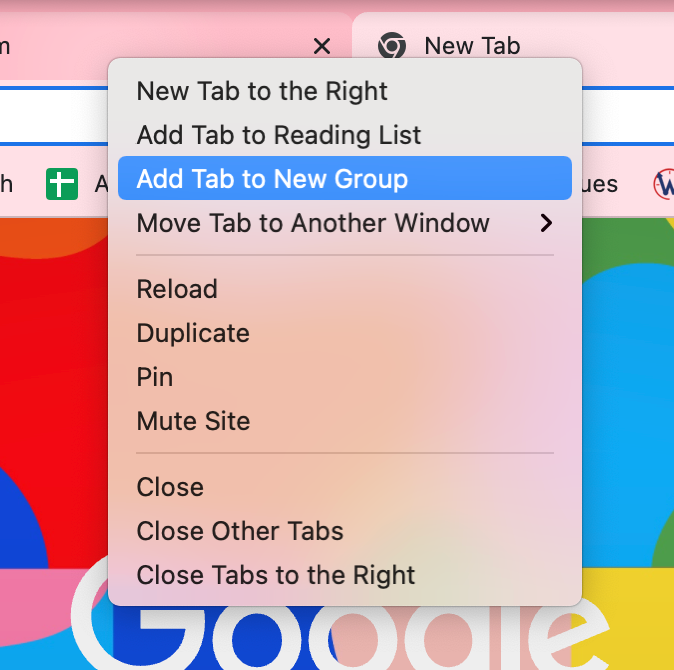
It should open a new set of options:
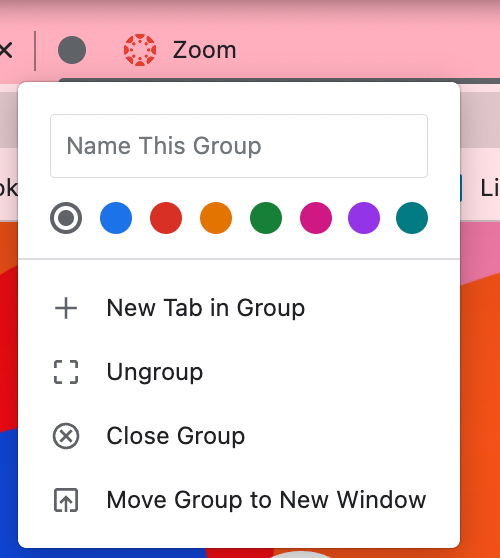
This is where you can add a name for the tab group. I usually go with an abbreviated version of the official class name. This is also where the tab color is chosen. So, sticking with the Environmental Hazard and Disaster example, I would choose green for this tab group and label it “EHD”. Unfortunately, there are not many options for color so sometimes I have to just choose the closest color.
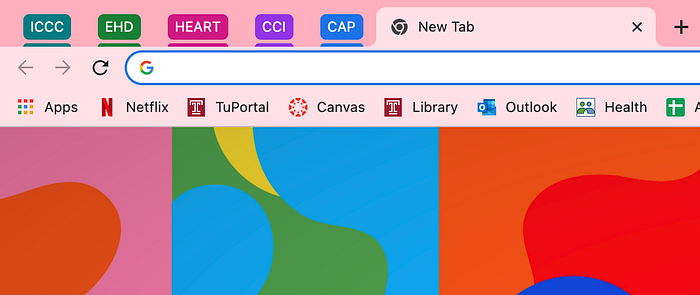
This is helpful to organizing because it makes it easier to know which tabs are for which class. I know that all of my work for Environmental Hazard and Disaster will be in the green tab folder.
Pro Tip: it is best to keep the tab name short because the longer the tab name the less space there is for other tab groups in the open window.
Physical Color-Coding
Even though technology can be very helpful with organizing, it isn’t everyone’s preference, and that’s okay! Or maybe you're like me, and do both! I feel that no matter how organized I am using technology, using a pen and a planner helps me remember the best.
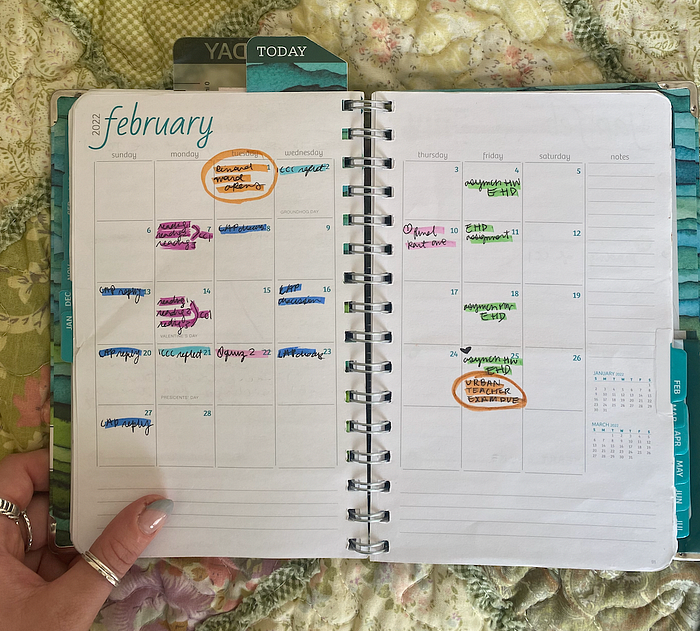
The materials I use are a planner, different colored highlighters, and a pen. If you have a preferred tool, then use those! I prefer having a planner that is broken up month and day. So in my monthly calendar, I use my highlights to highlight my class in their respective class color. I also use orange to indicate out-of-class deadlines and events.
In the daily part of my planner, I list what I have to do for the day. As I complete assignments I cross them off in my planner and check them off in my Google Sheet. Sometimes I forget to use my daily planner, but I have created safety nets for myself to refer back to (i.e. the Google Sheet assignment list.)
*Please excuse my handwriting lol!
Staying Consistent
No matter what you take and what you do not take from this article, I hope for one thing—that you stay consistent in what you do. Staying consistent across all platforms helps to avoid confusion and increase efficiency. It is hard and uncomfortable to build habits that are new but only they become second nature they can reap great rewards. Consistency can help create peace and balance through being organized. It is a nice feeling to not have the anxiety of forgetting about an assignment or the disappointment of going to class unprepared. Being consistent with color-coding has truly made me a more successful student.
Thank you for reading. I hope you come by again! Stay well and live authentically.
with love,
Emma ❤
